Archaeology is a destructive science. Generally there are no exciting explosions, or catastrophic collapses when undertaking an excavation, but all the same, once a site or portion of a site is excavated it is gone for good. Every good archaeologist is trained to take this fact into account when doing archaeological work. We sketch, note, measure, photograph, and generally record every minute detail of an excavation knowing that we are destroying the very thing we are interested in understanding. This is why there is more than a little truth in the old adage that for every day spent in the field, the archaeologist spends at least as much time, and often more, analyzing, interpreting, and reporting on the information that has been collected.
While most archaeologists are really, really (really!) good at recording details in the field, unfortunately sometimes their final reports can leave us here at the SHPO wanting more… details, that is. So we archaeology report reviewers have gathered a few tips and tricks for making sure that every archaeology report you send into the SHPO is all that it can be!
In case you missed it the first time: Read Part 1
Tip 1: Remember! It is likely the person reading your report has never been to your archaeological site.
Here at the SHPO we rarely get a chance to get out of the office to visit the projects that we review on a daily basis. We rely on the archaeologist to record all the information and produce a report that gives us everything we need to do our review– to make it seem as if we HAVE been out there. For us, this means that it is very important for you to clearly describe not only what you did in the field, but also why you did it, and to clearly show us where you did it too.
Project mapping is an arena in which many archaeological reports fall a bit short. For basic locational information, an appropriate section of a standard 7.5 minute USGS quadrangle map (scaled to fit an 8.5×11” page or an 11×17” fold out as appropriate) should always be included. We don’t need to see the whole topographic map, just enough to show the outline of the project area and enough of the surrounding area for us to find it on our own CRGIS maps. To that end, one important trick we would like to emphasize is to include a named spot on each topographic map figure (such as a town, village, a named cemetery, ridge line, hill top, stream, etc.). If such a spot is included on the map, we can quickly and easily search for that spot in the CRGIS when we are reviewing the report. It is also very helpful to have the map labeled with the name of the quadrangle. If there are multiple quad maps on the figure, please also label the different sheets and indicate where the map breaks are located. We need to have this information for data entry of report information into the CRGIS.
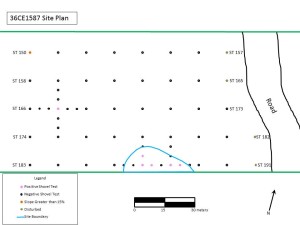
 For the more detailed project plan maps, the locations of shovel tests, surface collections and/or disturbed, wet, etc. areas should always be clearly indicated. We reviewers need to see the coverage of each part of the project area, and visually understand your choices in methodology. An important trick for making this type of mapping successful is the use of different symbols to indicate the results of testing (positive or negative), as well as the type of testing (shovel tests or excavation units). Don’t forget a key! In addition, plan maps should also clearly show which areas were not tested, and why (slope, disturbance, wet conditions, etc.). Documentation of disturbance in the project area should always include a description in the body of the report (including photographs or soil profiles showing disturbance or compromised stratigraphy); many times archaeologists forget to include visual representations of these issues on their project mapping.
Tip 2: Remember! Everything in the SHPO files is a public document to be used by others for future research.
Yep, everything. A large amount of archaeological data is collected through the compliance process. It is our hope that, through time, this data will advance archaeological knowledge in our state. That said, all of the information you put in your report should be useful, user-friendly, and understandable to the common person of intelligence. Leave out the jargon, skip the esoteric theoretical discussions, and please (we beg of you!) keep statistical analyses clear and relevant. Archaeologists should think about their compliance reports as public documents – representing them, their company, and ultimately their work in the clearest, best possible light. A good trick to making sure your report is clear and concise is to consider having a non-archaeologist read the survey results section of your report as part of your editorial process.
Of note, the usefulness of the information in our files for future research is a key reason why our office no longer accepts management summaries in lieu of complete reports. It has been our unfortunate experience that management summaries do not allow other researchers to figure out exactly what you did, why you did it, where you did it, what you found, and so forth.
Tip 3: Remember! Think about report curation – for posterity!
Here at the SHPO we spend a fair amount of our time managing the curation of all the archaeological reports submitted, for posterity. Reports are routed, processed, data entered, scanned, mapped, foldered, filed, researched, cosseted, and loved. Some reports hold up better than others through all this handling. There are several tricks you can use to make sure your reports remain forever (or a reasonable approximation thereof) the shining examples of your work that you intend them to be when you submit them.
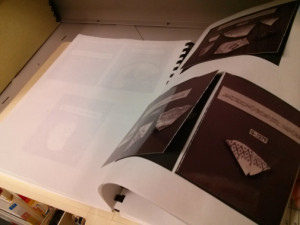
First, photographs should be in color and embedded in the body of the report. These pages should adhere to the National Park Service archival standards for ink and paper. Pages with photographs should be printed on photographic paper and bound into the report. The ultimate goal of binding the photo paper pages into the report is to avoid having glued photos come unattached from the report or having glue ruin the picture over time. Unfortunately we do have a collection of orphaned photographs in our files – photos which sadly will never know the warmth and belonging of home ever again.
Second, reports should be bound with comb or spiral binding. We are still receiving reports with staples or in three ring binders. Staples are not archivally stable and three ring binders will not fit on our already overloaded shelves. We also recommend clear cover sheets for each bound report – these sheets help protect the report from future handling and use.
Tip 4: Remember! Completed forms makes for better data!
Report summary forms should be filled out completely and bound into reports as an appendix. The information on this form is what we use to data enter reports into CRGIS, and is in turn used by consultants to do research. If this form becomes separated from its report, or is not filled out correctly, misinformation runs rampant! This goes for Pennsylvania Archaeological Site Survey (PASS) forms as well.
Many of these concepts are already well known and well loved by our fellow archaeologists out there, but we still hope these tips and tricks are useful or helpful for you in your report production and report submission for compliance review! Happy Reporting!
Co-Authored by Mark Shaffer, Steve McDougal, and Kira Heinrich
Comment Policy
PHMC welcomes and encourages topic-related comments on this blog. PHMC reserves the right to remove comments that in PHMC’s discretion do not follow participation guidelines.
Commenters and Comments shall be related to the blog post topic and respectful of others who use this site.
Commenters and Comments shall not: use language that is offensive, inflammatory or provocative (this includes, but is not limited to, using profanity, obscene, or vulgar comments); disparage other commenters or people; condone illegal activity; identify the location of known or suspected archeological sites; post personal information in comments such as addresses, phone numbers, e-mail addresses or other contact details, which may relate to you or other individuals; impersonate or falsely claim to represent a person or an organization; make any commercial endorsement or promotion of any product, service or publication.
If you would like to comment on other topics not related to this blog post but related to PHMC, please fill out the PHMC Contact Us Form.

Leave a Reply